You know that penetration tests are important to run— and that more and more companies are integrating them into their annual cybersecurity initiatives.
Despite all the value a penetration test may hold, many businesses aren’t using the results to their full potential. It’s not that they’re purposely neglecting improving their security, they just don’t know how to “decode” the pentesting report results.
That’s because many pentesting reports are packed with "techy" words that exec management and other decision-makers don’t understand.
Don’t let your penetration testing report intimidate you. All you need is a glossary to translate the industry lingo into layman’s terms.
Here are some troublesome words that someone without a cybersecurity background may need explained:
1. Scope
When you first open your pentesting report, the first section you’ll see after the initial Overview section is Objective & Scope. While you probably understand that the objective is the “goal” of the pentest itself, scope defines specific details of that engagement to reach the goal(s).
The scope outlines all the things that’ll be tested and what will be excluded from the attack. It’ll detail what networks, applications, databases, accounts, people, physical security controls and other assets the penetration testers can go after.
This Objective & Scope will often even define the type of pentesting engagement it is, such as an external network or application pentest, so you’ll know with certainty where the focus lies.
Example of Scope:
Your report may define the objective as gaining access to a certain network, and couple it with a scope:
Attempt to obtain access to the (name of) internal network through any offensive cybersecurity measures:
- Social engineering
- Wireless network compromise
- External network
- External web applications
The scope also involves your agreed-upon timeline for the engagement.
2. Attack Vectors
After discussing your Scope and leading with a brief summarized overview of what the pentesters uncovered, the report will detail the specifics of how they compromised your system. The report will explain the attack vectors they used to breach you, which is just a fancy way of saying the path they took to gain access to your data.
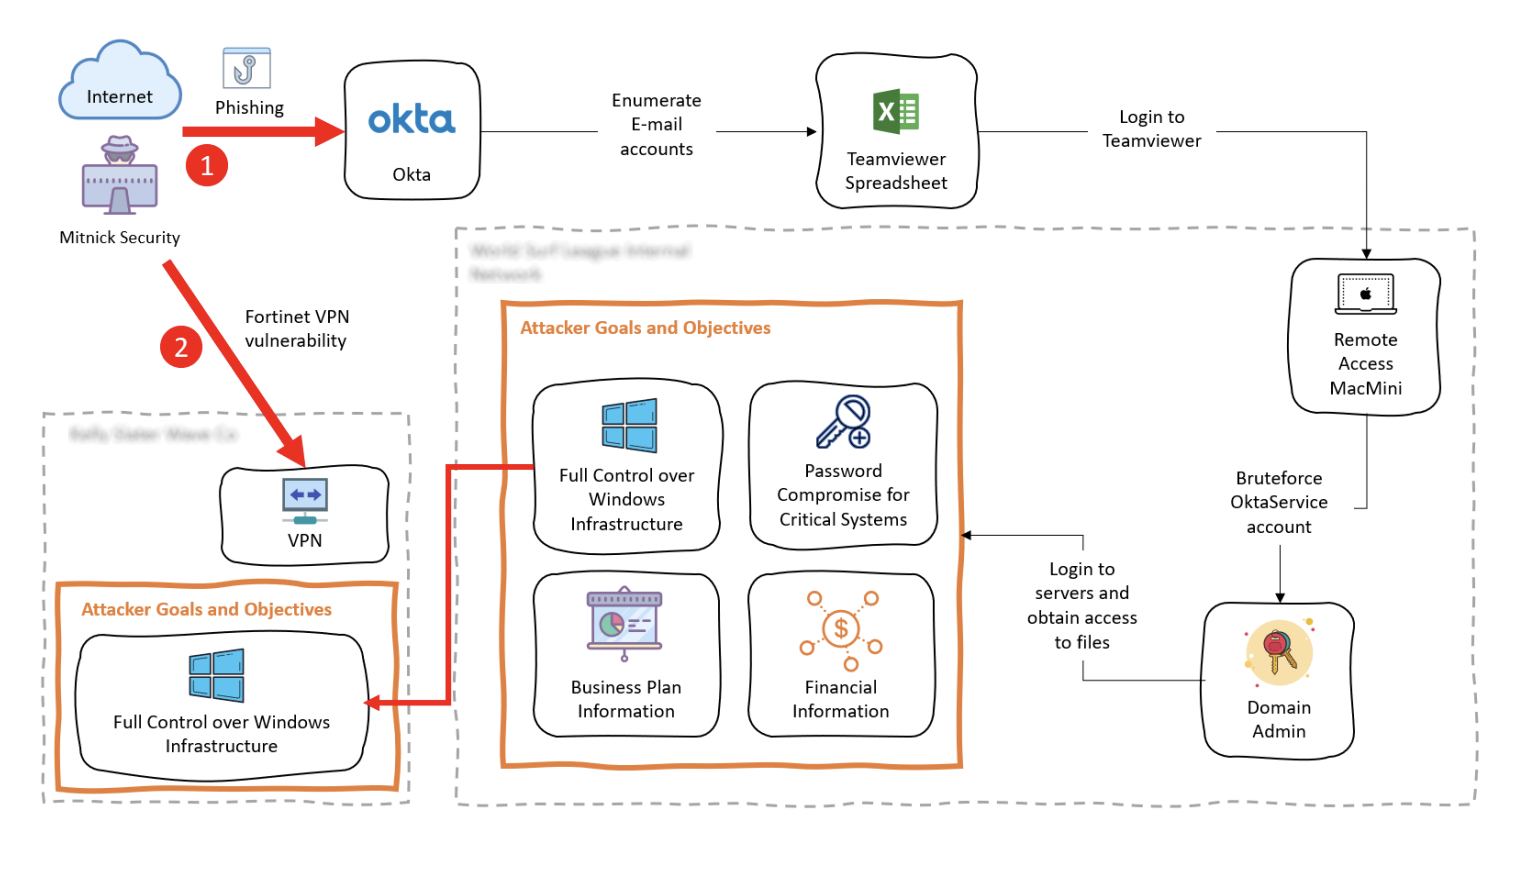
Example of Attack Path:
Within your penetrating report, there will be a written explanation of the way(s) the pentesters successfully breached your system. This means of attack is sometimes illustrated with an image, especially if the pathway had many steps and becomes complex.
In the example below, you can see the hacker used an attack path of “phishing” to access an important Cloud software service the client was using as well as “exploiting a VPN vulnerability” to gain access to their virtual private network.
Learn more about the Attack Phase of penetration testing here.
3. Chronological Attack Narrative
There’s often more than one attack vector pursued in a pentest— and each vector involves complex pathways to get from the initial breach to the information the pentesters are seeking. Because of this, the pentester will often explain the journey in a detailed narrative, much like telling the story of how they got from Point A to Point B (and then C, D, E, etc.).
The Chronological Attack Narrative shows how the pentesters did their magic, in order of attack. It will often detail pictures or screenshots from the engagement, like the social engineering email the pentester sent out that an employee clicked an infected link in or the folders in a server they were able to see and access.
Example of Chronological Narrative:
Privilege Escalation of {insert name} Server
- Used {insert name here} exploit. This section would go into detail about how the pentester registered a user, added an SSH key to the account and executed the exploit using a private key generated by the pentesters. They may then share how this allowed them to execute certain commands as a “root.”
- Gained access to {insert name here} key. Here the pentesters may show screenshots and the steps they took to get inside of the user’s home folder, where they found a SSH key, which had access to several production servers and is an admin user with SUDO privileges.
- Decoded {specific asset}. Once the pentesters had access to certain files, they may explain how they wrote and used a script to decrypt them.
- Etc.
This is just a high-level look at one part of this rather lengthy section of a pentesting report. Every narrative will be unique, often showcasing many specific screenshots and examples of the attack vectors and resulting escalations.
Curious to better understand this section of the pentesting report? Learn more about the Chronological Attack Narrative here.
4. Lateral Movement
From reading about your attack vectors and the Chronological Narrative, you’ll notice that there are many steps for breaching a system. It’s not often a matter of doing one thing and gaining full access to the full database.
After breaching a system, a hacker will use a number of techniques to move even deeper into the network to uncover more sensitive information. The attacker will lay low and not make themselves noticed while making lateral movement through the environment to glean more info.
Example of Lateral Movement
There are three stages to lateral movement— reconnaissance, credential/privilege gathering, and gaining access to other computers in the network— which you could further explore should you be interested:
- Stage 1 - Reconnaissance:
An example would be performing extensive OSINT research to devise a clever pretext for baiting an employee.
- Stage 2 - Credential/Privilege Escalation: A social engineering tricks their target into sharing private information that leads to access to a private login.
- Stage 3 - Gaining Access: Once into the network, internal reconnaissance starts until the bad actor racks deeper through the system, laterally moving through their current access and escalating privileges undetected until they gain what they are after.
An example would be an attacker getting into one user's credentials and finding a password document with logins for important portals, which unlock access to juicer data.
5. Privilege Escalation
Pentesters understand certain users have higher permissions than others that grant them access to sensitive data. With this in mind, a pentester’s goal is often to gain access to an elevated permission user directly (called vertical escalation) or to take a lower permissions level user and “escalate” their permissions (horizontal escalation).
With this deeper accessibility, the pentest can laterally move deeper into the network to access higher protected troughs of data.
Example of Privilege Escalation:
Once into a high permissions level user’s computer, a pentester may be able to see what services you have running on your device and what users are running those services. From there, they could inject a malicious code into one of your processes. This may allow them to retrieve privileges from the process owner, like the domain administrator, giving them otherwise unauthorized access to private data.
6. Technical Vulnerabilities
After reading through the attack narrative, your pentesting report will usually segway into a list of your technical vulnerabilities. These are the security holes that the pentesters uncovered— given a name and description.
Example of Technical Vulnerability:
One technical vulnerability you may see in your pentesting report could be “Insufficient Endpoint Protection.” The report may explain that during their test, they found the following:
The endpoint security solution used (company name) was (antivirus brand).
The antivirus solution did not create any additional complexity, nor was a bypass necessary throughout the project.
The solution did not block any penetration testing non-malicious malware used by our security company.
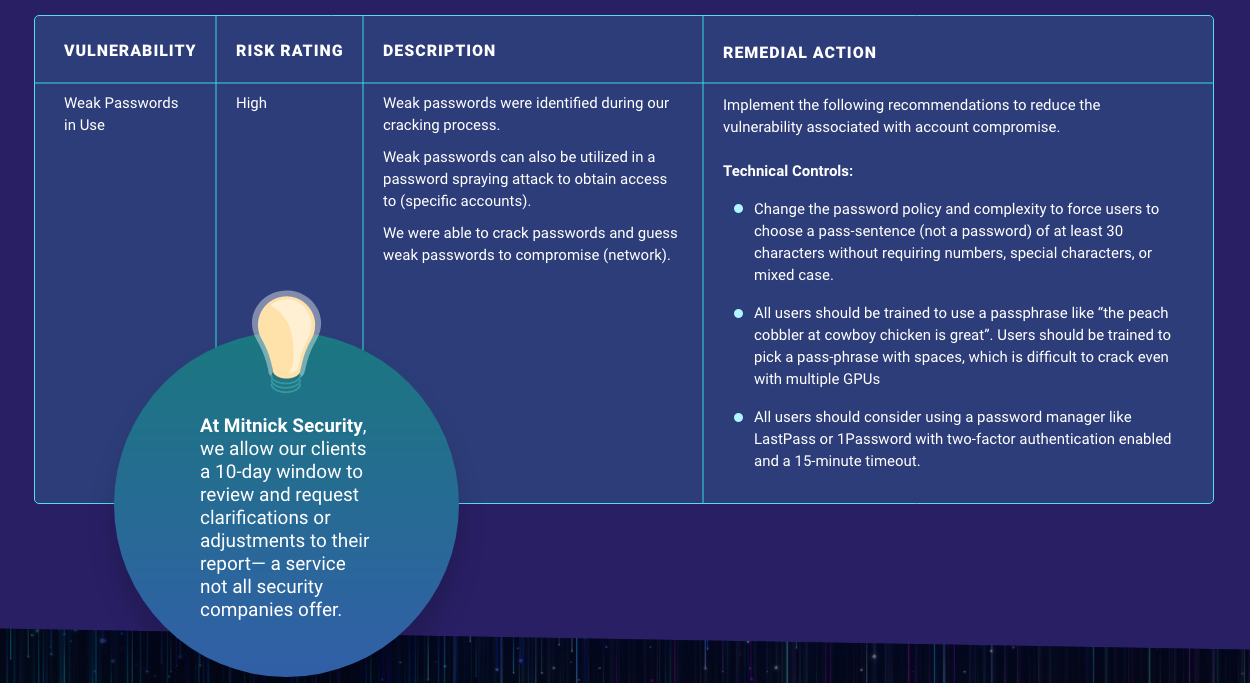
7. Risk Rating
Every technical vulnerability listed in your pentesing report will be given a risk rating, which is usually organized by the following:
- Critical risk
- High risk
- Medium risk
- Low risk
- Informational (no risk)
Every pentesting company may have its own definition of what these individual risk ratings mean, but generally, they are weighted similarly.
Example of Risk Rating:
Here at Mitnick Security, our risk rating system is as follows:
- Critical Risk. An attacker could abuse this vulnerability to instantly obtain code execution or compromise highly sensitive assets and information within the organization.
- High Risk. An attacker who can exploit this vulnerability in conjunction with another weakness would be able to obtain access to highly sensitive information within the organization.
- Medium Risk. An attacker has to combine such a vulnerability which is difficult to exploit with multiple other vulnerabilities to access highly sensitive information within the organization.
- Low Risk. These vulnerabilities are highly unlikely to be exploited individually and are used generally in conjunction with Medium risk or higher vulnerabilities to gain access to highly sensitive information within the organization.
- Informational. No risk is posed directly to the organization. Such vulnerabilities can be used in conjunction with typical adversarial techniques to attack the target organization.
8. Remedial Actions
After you know your technical vulnerabilities and their risk rating, the pentesting report will include a list of Remedial Actions which are key takeaways for how you could fix the gap in your security.
Example of Risk Rating:
A client with a Medium risk for “Insufficient Endpoint Protection” may receive the following recommendation for remediation:
An Endpoint Detection and Response (EDR) solution should be deployed to provide modern defense for workstations and servers.
Most EDR agents can support both Windows and macOS and can feed log direction into a SIEM.
The Power of a Detailed Pentest Report
Now that you’ve learned a little about the lingo used inside a pentesting report, do you feel more confident putting your results to good use?
Discover how our world-class pentesters helped World Surf League improve their security by reading their case study— and receive one of the most detailed reports in the industry from our team at Mitnick Security.


